Showing posts with label craft. Show all posts

December 22, 2011

DIY: Wood Slice Picture Frame

I saw this frame on Modcloth.com and thought, wow I could totally make that! So this is my version, it’s a pretty easy and quick DIY and it turns out really awesome! Now I should give a little disclaimer, I say it’s quick and easy, but my father cut all of the wood for me and then actually mailed it to me [as we live quite far apart]. How nice was that? Thanks Dad!!


Photo is mine, of my grandfather.


What You Need:
Sticks to cut up, or already sliced sticks/wood
Hot glue gun and glue
Picture frame


What You Do:

1. First you need to slice up your wood. Decide on a thickness and try to stick close to that. I believe I had my father cut mine between ¼ and ½ of an inch.


2. Lay out the slices on your frame. Mine kept slipping off, but it definitely helped. It gave me a starting point. I had to adjust and improvise near the end, but I definitely recommend laying them out a bit to help get you started.


3. Start gluing them on! I used hot glue, but I’m sure there are better glue you could use. Hot glue has a bad rep of popping off [I think], but it’s what I had available and honestly it worked fine.

See! Super easy! I have some left over wood slices, so I’m trying to think up some ways to use them. I’m thinking maybe some coasters for my Dad’s bar? Should be pretty easy, some felt, some cardboard and more glue! :)

December 9, 2011

Friday Favorites: Map Love!!

I don’t know if I ever have mentioned what my day job is - I’m a GIS Coordinator. Go ahead google it, you know you want to. I’ll wait.

Alright, the gist of it is map work. Or at least that’s the gist of it for this post! In any case, I’m a total map nerd! So, here is some map love courtesy of pinterest and all those other map nerds. :)


*Such a good idea for an art piece and/or gift!*


*Hmmm, I wonder where I could find room for this. Actually, I wonder where I could even get a huge wall map? OH! Maybe I should ask my geography teacher boyfriend? :P*


*I shall start collecting globes*


*Fantastic!*


*Cute!*


*I need to make this asap!*


*This is a must have for any map nerd’s Christmas tree!*


*This could be a really great gift for someone!*


*umm, Yes pelase!*


*Ooo, I like! Very pretty!*


*Just a few more ideas....*

Happy Friday!

October 6, 2011

DIY: Art Wall

Hello lovlies!

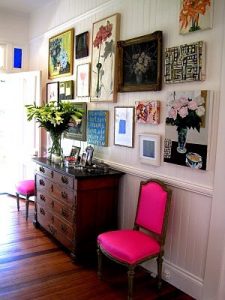
Today I thought I would share another home project with you. I have this huge stark white wall in my living room that is just asking for some love and attention. Originally, I had planned on asking my landlord if I could paint it, but then I thought it seemed silly to spend extra time and money on something that I can’t take with me when I move. So, then I decided I would figure out some sort of art piece [or a couple] to take up the space.

After much research, I decided I would just do an interesting photo wall. Pinterest really helped me out on this. :)


In a magazine or somewhere, I can’t remember, I had seen a picture of a wall with lime green empty frames and I was instantly in love. I decided that I liked the more ecclectic/mis-matchy feel, rather then the photos be all lined up and the same. So, I started collecting random frames from our local thrift shop. Super cheap and a great way to get a good mix. Here’s a little walk through and some pictures of what I have done so far.

After I gathered enough frames, I started playing with the layout. First I was doing this on my livingroom floor, but I just couldn’t get it right. You’re probably going to laugh at this next thing, but oh well. I decided to measure all the frames the create a layout in photoshop. :)


It worked really well! After that I laid them out on the floor according to the PS image, to get a better idea of how they worked together. I was happy with it, so then on my PS sheet I assigned a color to each frame, then moved on to spray painting!


First, just let me say I’ve never spray painted anything before, so I was just sort of flying by the seat of my pants. I read a couple online articles about painting frames, then I just got on with it! For the wooden frames I lightly sanded them with 220 grit - lightly! Then I primed them. I also primed all the other dark frames.


After the primer set, I sprayed the frames according to my little cheat sheet. I ended up changing a couple and added a third color, but basically stayed with my originally idea. I had a couple hiccups with little gnats, some drips and some major finger cramps, but all in all it worked pretty well!


Next is hanging them! AHH! Obviously, I wanted to be sure they got up there straight and that the spacing was correct. After thinking on it for awhile I decided to use the ol’ newspaper trick. Basically, you lay out some news paper [or tissue paper, wrapping paper, whatever], lay your frames on top of it then trace them. I even went so far as to figure out about where my nail holes should go. You then tape this masterpiece up on the wall and hammer in all your nails. I hung up the frames once too, just to get a feel for it all.


Now just rip the paper off and ...VOILA! For hanging frames I keep some wall putty on hand in case there are some unruly ones that refuse to sit straight. A little pinch in the corner will work magic!


Isn’t it beauTIful?

The artwork are just different prints I had or printed. I actually created the one with the Incubus lyrics in photoshop with an image I found through google. Fun stuff! :)

If you have an questions on this project or if you have ideas/tips from your own experiences please share them!!

peace, kassie

September 29, 2011

DIY Book Wreath

Hello All!

My little business trip went very well, but now I am back to the regular grind. Anyway, how about a DIY post?

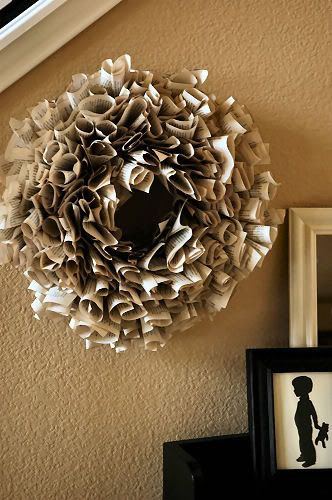
Okay, so I have been seeing these Book Page Wreaths all around the blogosphere and I absolutely love them! After looking at a couple different styles, I finally decided on the one by Living with Lindsay.


I essentially followed her instructions, so I won’t go into much detail. I’ll just give you a quick over view and show you some fun pictures!  Be sure to check out Lindsay's blog post for a full tutorial!
What I used:  A couple books, some spray paint for the edges (sort of like in Lindsay's), a foam wreath, hot glue gun
 This is that first step where you glue the rolls to the back first, then flip it over and start adding more to the wreath. 
 Getting a bit fuller now...
 And FINISHED!!!

I do think I made mine “tighter” so to speak, b/c I definitely ran out of book! I had another book that I sorta filled some spaces in with. I’m pretty happy with the result, but I have a feeling I’m going to add a bit more to the center to cover up some ugly parts. You can’t really tell in the picture, but in the center you can see where I glued some pieces. I'm not going to lie, took much longer than I expected, but I used a larger wreath.  For the loop to hang it I plan on just used some hemp twine I have. I think it will look nice with the book pages. Then, since I rent and don’t want holes I will be using a 3M removable hook and attach it to the inside of my door. I’m not 100% sure I'll like it there, I may put it on the adjacent wall. Anyway, if you have any questions about what I did, or any thoughts/suggestions, just let me know!

For now, I’m off to work on another project - one that has been in the works for awhile. I can’t wait!

peace, kassie
Related Posts Plugin for WordPress, Blogger...